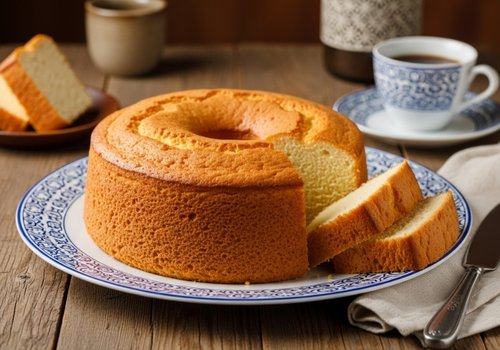

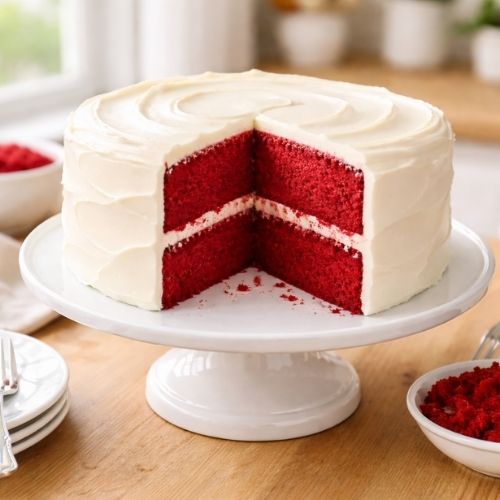
I still smile when I see a bright red slice of cake on a plate. The waldorf astoria red velvet cake recipe is more than a dessert. It is a piece of hotel history you can bake at home. This is the original Waldorf Astoria red velvet cake recipe, made with soft Ermine frosting, not cream cheese.I have tested many cakes over the years. This waldorf astoria cake recipe stands out every time. It uses buttermilk for a light tang and a soft crumb. The texture feels rich but not heavy.
If you have been looking for the true recipe for Waldorf Astoria red velvet cake, this is it. I will show you how to make Waldorf Astoria red velvet cake recipe step by step. Let’s bake this classic waldorf red velvet cake together.
Why You’ll Love This Waldorf Astoria Red Velvet Cake Recipe
- It follows the original Waldorf Astoria red velvet cake recipe, just like the one that made the hotel famous.
- It uses soft Ermine frosting, not cream cheese, so the taste is light and smooth.
- The crumb is tender from shortening and buttermilk, just like the classic waldorf astoria cake recipe.
- The cocoa is mild, so this waldorf red velvet cake is not too sweet or too rich.
- The steps are clear and simple, even if this is your first waldorf cake.
- You can bake it in 8-inch or 9-inch pans with ease.
- It feels fancy, but it is easy enough for a weekend bake.
- You will learn exactly how to make Waldorf Astoria red velvet cake recipe at home, with no stress.
This is not just another red velvet cake recipe Waldorf Astoria style. It is the real thing, made simple and made with care.
Ingredients for the Original Waldorf Astoria Red Velvet Cake
When I first tried this recipe for Waldorf Astoria red velvet cake, I was shocked by how simple it was. No rare items. No odd steps. Just smart use of basic tools. That is why the original Waldorf Astoria red velvet cake recipe still works today.
The Cake
- ½ cup shortening – Makes the crumb soft and light. This is key in a true waldorf red velvet cake.
- 1 ½ cups sugar – Adds sweet taste and helps the cake stay tender.
- 2 large eggs – Give shape and hold the cake together.
- 2 oz red food color (liquid) – Gives the bold red look of a waldorf astoria red cake.
- 2 tbsp cocoa powder (natural) – Adds mild cocoa taste. Not too rich.
- 1 cup buttermilk – Adds a soft tang and keeps the cake moist.
- 2 ¼ cups cake flour (sifted) – Keeps the cake light and fine.
- 1 tsp salt – Balances the sweet.
- 1 tsp vanilla – Adds warm flavor.
- 1 tsp baking soda + 1 tsp white vinegar – This mix makes bubbles. It helps the cake rise.
Each item has a clear role. That is why this waldorf astoria cake recipe gives a soft bite every time. If you want to know how to make Waldorf Astoria red velvet cake recipe the right way, measure well and use natural cocoa.
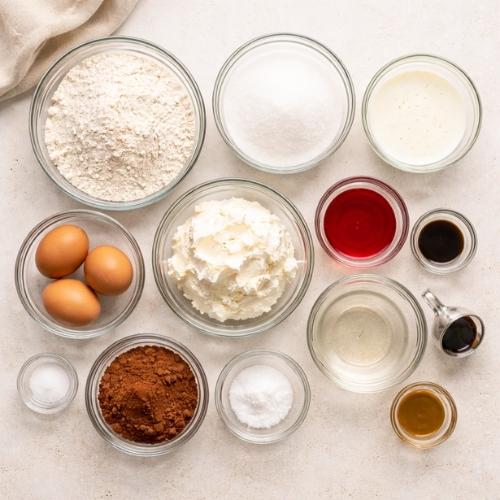
The Traditional Ermine Frosting (Cooked Icing)
- 1 cup whole milk
- 3 tbsp flour
- 1 cup sugar
- 1 cup unsalted butter (soft)
- 1 tsp vanilla
This frosting is smooth and light. It is not too sweet. That is why the old waldorf cake used it. It lets the cake shine.
How to Make Waldorf Astoria Red Velvet Cake Recipe: Step-by-Step
I promise, this part is easier than it sounds. The method for this waldorf astoria red velvet cake recipe is simple and clear. Just take it one step at a time. Think of it like building a house. Each layer matters.
Step 1 – Prep the Pans
First, heat your oven to 350°F. Grease and flour your pans well. I like to line the base with paper too. It saves stress later. A well-prepped pan means your waldorf red velvet cake will slide out with ease.
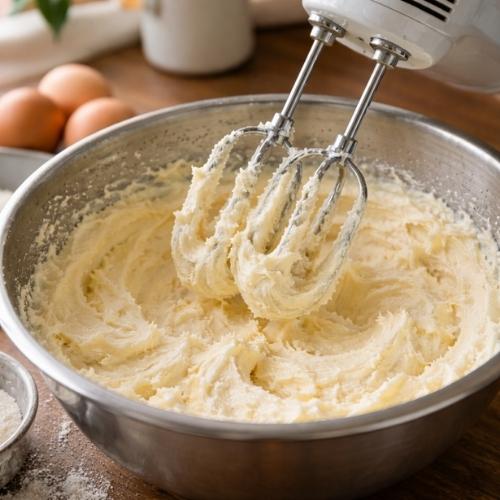
Step 2 – Cream the Shortening and Sugar
Beat the shortening and sugar until light and fluffy. This step adds air. Air makes the cake soft. Do not rush it. A good cream base is key in any true waldorf astoria cake recipe.
Add the eggs one at a time. Mix well after each one. The batter should look smooth and pale.
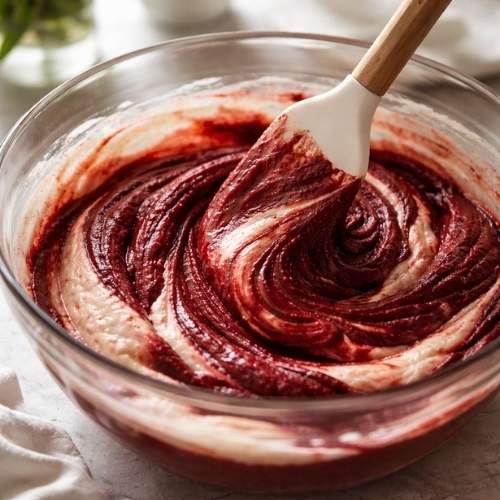
Step 3 – Make the Cocoa Red Paste
In a small bowl, mix the cocoa and red food color into a thick paste. This step gives the bold look of a waldorf astoria red cake. Stir the paste into the batter. Blend until the color is even.
This old method is part of the red velvet cake original recipe Waldorf Astoria style. It helps the color stay rich.
Step 4 – Alternate Dry and Wet Ingredients
Mix the flour and salt in one bowl. Add the flour and buttermilk to the batter in turns. Start with flour. End with flour. Mix on low and stop once blended.
Do not overmix. Too much mixing makes the cake tough. We want soft and light.
Step 5 – Add the Baking Soda and Vinegar Reaction
In a small cup, mix the baking soda and vinegar. It will foam fast. Pour it into the batter right away. Fold gently.
This step gives lift. It makes this waldorf astoria red velvet cake recipe easy and airy.
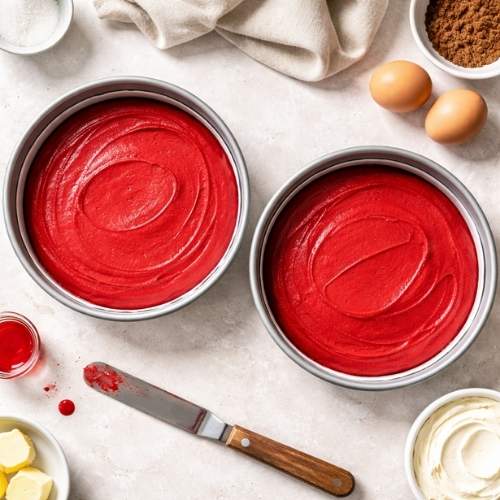
Step 6 – Bake and Cool
Divide the batter into your pans. Bake for 24 to 30 minutes. The center should spring back when touched. A toothpick should come out clean.
Let the cakes cool in the pan for a short time. Then turn them out and cool fully. Now you are ready to frost your red velvet cake recipe Waldorf Astoria style.
See? Simple steps. Clear method. That is how to make Waldorf Astoria red velvet cake recipe with calm and care.
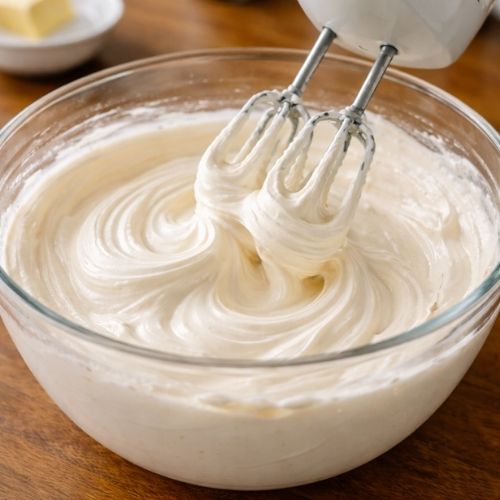
How to Make the Original Ermine Frosting
If you want your cake to taste like the original Waldorf Astoria red velvet cake recipe, this frosting matters. Ermine frosting is not overly sweet. It is light, smooth, and stable. It spreads well and pipes well. That is why the classic waldorf astoria cake recipe used it instead of cream cheese.
Here is the exact method I use every time:
Step 1 – Cook the Milk and Flour
- Whisk 1 cup milk and 3 tbsp flour in a saucepan.
- Cook on medium heat. Stir the whole time.
- It will thicken into a smooth paste, like pudding.
- Do not rush. Smooth texture now means smooth frosting later.
Step 2 – Cool Completely
- Transfer the paste to a bowl.
- Press plastic wrap on top so no skin forms.
- Let it cool fully to room temp.
- If it is warm, the butter will melt and the frosting may split.
Step 3 – Cream Butter and Sugar
- Beat 1 cup soft butter and 1 cup sugar until very light.
- This may take 3–5 minutes.
- The mix should look pale and fluffy.
- This step builds the structure of your frosting.
Step 4 – Add the Paste and Whip
- Add the cooled paste one spoon at a time.
- Beat on medium-high speed.
- Whip for about 4–5 minutes.
- The frosting will turn silky and light, almost like whipped cream.
Troubleshooting Tips
- If it looks curdled: Keep beating. It usually fixes itself.
- If it feels too soft: Chill for 10–15 minutes, then whip again.
- If it feels dense: It likely needs more whipping time.
This frosting is what makes a true waldorf red velvet cake stand out. It is balanced. It is smooth. It supports the layers without being heavy. That is why the red velvet cake original recipe Waldorf Astoria style still feels elegant today.
Ermine Frosting vs Cream Cheese Frosting (What’s the Difference?)
Many people think every waldorf astoria red velvet cake has cream cheese frosting. That is common today. But the original Waldorf Astoria red velvet cake recipe used Ermine frosting. That is a big difference.
Ermine frosting is light and smooth. It feels soft, like fresh whipped cream. It is not too sweet. It lets the mild cocoa in a true waldorf red velvet cake stand out.
Cream cheese frosting is thick and rich. It has a sharp tang. It is also much sweeter. Some people love that bold taste, but it can hide the soft crumb of a classic waldorf astoria cake recipe.
If you want the red velvet cake original recipe Waldorf Astoria style, choose Ermine. It gives balance. It feels clean on the tongue. It keeps the cake light, just as it was meant to be.
My Personal Tips for a Perfect Waldorf Cake
- Do not overmix the batter.
Mix just until smooth. Too much mixing makes the crumb tight. A true waldorf red velvet cake should feel soft and light. - Use cake flour for the best texture.
Cake flour gives a fine, tender crumb. It helps this waldorf astoria cake recipe stay delicate, not heavy. - Measure the red food color with care.
Too little and the cake looks dull. Too much and it can taste bitter. The goal is that deep waldorf astoria red cake glow. - Use natural cocoa, not Dutch.
Natural cocoa works with the buttermilk and vinegar. That reaction gives lift in the original Waldorf Astoria red velvet cake recipe. - Let the Ermine frosting cool fully before whipping.
Warm paste can cause a split texture. Patience here makes the frosting smooth and silky. - Chill the cake before slicing.
A short rest in the fridge helps the layers set. Clean slices make your waldorf cake look neat and proud. - Level your layers if needed.
A flat base keeps the cake steady. It makes stacking easier and more stable. - Optional: Try beet puree for a natural touch.
Some modern versions use beets for color and moisture. It is not in the original recipe for Waldorf Astoria cake, but it can add a soft earth note.
These small tips may seem simple, but they matter. They turn a good cake into a great one. And when you follow them, your waldorf astoria red velvet cake will taste balanced, light, and true to its roots.
Common Mistakes to Avoid
- Using Dutch cocoa instead of natural cocoa.
I made this mistake once. The cake looked fine, but it did not rise the same. Natural cocoa works with the buttermilk and vinegar. That reaction is key in the original Waldorf Astoria red velvet cake recipe. - Skipping the vinegar.
It may seem small, but it matters. The baking soda needs acid to lift the cake. Without it, your waldorf red velvet cake can turn dense. - Overmixing the batter.
It is tempting to keep the mixer on. I get it. But too much mixing makes the crumb tight. A true waldorf astoria cake recipe should feel soft and light. - Adding frosting to a warm cake.
I have rushed this before. The frosting slid right off. Let the layers cool fully before you frost your waldorf astoria red cake. - Not cooling the Ermine paste fully.
Warm paste can break the frosting. It may look curdled. Patience here protects the smooth finish of your red velvet cake original recipe Waldorf Astoria style. - Using too much food color.
More is not always better. Too much can add a slight bitter note. The goal is rich red, not harsh red.
Small errors can change the final result. But once you know what to watch for, this waldorf cake becomes simple and steady. Bake with care, and the texture and flavor will reward you.
Storage and Make-Ahead Tips
- Store the frosted cake in the fridge.
This waldorf astoria red velvet cake has butter in the frosting. It stays fresh longer when chilled. Cover it well so it does not dry out. - Let it sit at room temp before serving.
Take it out 30 to 45 minutes before you slice. The crumb will feel softer. The Ermine frosting will taste smooth and light, just like the original Waldorf Astoria red velvet cake recipe. - Wrap unfrosted layers tightly.
You can bake the layers a day ahead. Wrap them in plastic once cool. This keeps your waldorf red velvet cake moist. - Freeze the cake layers if needed.
Wrap each layer well. Then place in a freezer bag. They can freeze for up to two months. Thaw in the fridge overnight. - Freeze slices for quick treats.
I like to wrap single slices. It feels like a gift to my future self. Just thaw and enjoy a piece of this classic waldorf cake anytime. - Store extra frosting in the fridge.
Keep it in a sealed container. Before using, let it warm slightly and whip again. This helps restore the smooth texture of your waldorf astoria cake recipe.
Good storage keeps flavor and texture just right. With a little care, your red velvet cake original recipe Waldorf Astoria style will taste fresh for days.
“watch this Waldorf Astoria red velvet cake recipe tutorial.”
Final Thoughts on This Classic Waldorf Astoria Red Cake
There is a reason this cake still shines today. The original Waldorf Astoria red velvet cake recipe is simple and smart. Each step has a clear job. That is why this waldorf astoria red velvet cake recipe works so well.
When you bake this cake, you bake more than a sweet treat. You bake a small piece of history. The soft crumb and light frosting feel calm and clean. A true waldorf red velvet cake is rich, but not heavy.
If this is your first time making a waldorf astoria cake recipe, do not stress. Go slow. Follow the steps. Soon, you will see why the red velvet cake original recipe Waldorf Astoria style is still loved.
I hope this waldorf cake brings joy to your table. Share it with family or friends. Good cake, like good stories, is meant to be shared.
Frequently Asked Questions
Is this the original Waldorf Astoria red velvet cake recipe?
Yes. This version follows the original Waldorf Astoria red velvet cake recipe with cooked Ermine frosting. It reflects the classic waldorf astoria cake recipe served before cream cheese became common.
Can I use cream cheese frosting instead?
Yes, you can. Many modern versions of the recipe for Waldorf Astoria cake use cream cheese frosting. However, the true waldorf astoria red velvet cake recipe uses Ermine for a lighter taste.
Why does this recipe use shortening?
Shortening gives the cake a soft, fine crumb. It helps this waldorf astoria cake recipe stay light and tender. That texture is key in the classic recipe for Waldorf Astoria cake.
Can I make this into cupcakes?
Yes. This waldorf astoria red velvet cake recipe works well as cupcakes. Bake at the same temp and check at 18–20 minutes. The texture stays soft and moist.
What makes Waldorf Astoria cake different from regular red velvet?
The waldorf astoria cake recipe uses shortening and Ermine frosting. Many modern red velvet cakes use oil and cream cheese. The original recipe for Waldorf Astoria cake tastes lighter and less sweet.
Waldorf Astoria Red Velvet Cake Recipe
Ingredients
Equipment
Method
- Preheat oven to 350°F. Grease and line two round cake pans.
- Cream shortening and sugar until light and fluffy.
- Add eggs one at a time and mix well.
- Mix cocoa and red food coloring into a paste and blend into batter.
- Alternate adding flour mixture and buttermilk. Mix just until combined.
- Stir baking soda and vinegar together and fold into batter.
- Divide batter into pans and bake 24–30 minutes.
- Cool completely before frosting.
- Cook milk and flour over medium heat until thickened. Cool fully.
- Beat butter and sugar until light and fluffy.
- Add cooled paste gradually and whip until smooth and silky.
- Frost cooled cake layers evenly.
Notes
Do not overmix the batter.
Cool cake fully before frosting.
Chill briefly before slicing for clean cuts.
Related Post
- belizean onion sauce recipe
- Belizean Pepper Sauce Recipe
- Best Belizean Milk Cake Recipe
- Ninja Woodfire Grill Chicken Breast Recipe
- belizean crab soup recipe
- apple crisp vs crumble
- belizean rice pudding recipe
- belizean creole bread recipe
- Best AIP Soup Recipes

I’m Mehemed Khan, a passionate home cook who loves creating easy, flavorful, and healthy recipes. I share practical cooking tips and everyday meal ideas to help you cook smarter and enjoy every bite.